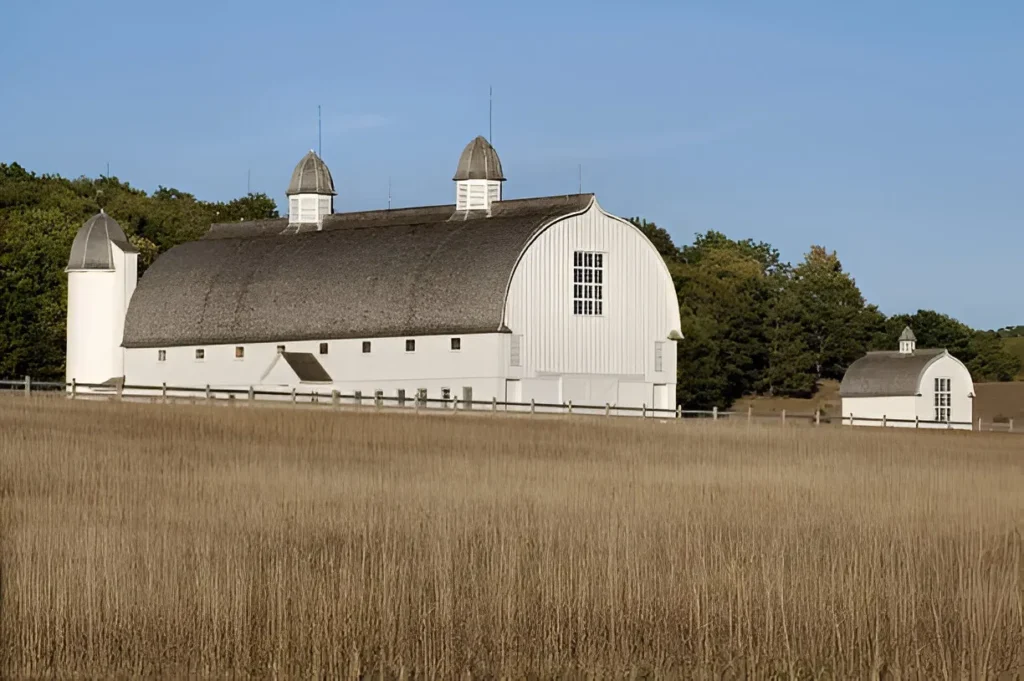
Gambrel roofs, or two-sided roofs, have a structure with two slopes on each side. The lower slope is much steeper, and the upper slope is more gradual. This slope design is not just about looks — it also provides a spacious interior, making it a perfect fit for barn roofs and large buildings.
The Gambrel style dates back to the 16th century. It was widely used in 16th-century architecture and became common in the 18th century across America. The design is really one of the best among all roof styles, and it is especially popular in the countryside and other rural areas. Even today, gambrel roofs are commonly seen in modern homes where space is limited.
The slope variation not only creates aesthetic appeal but also improves water runoff and adds functional headroom. It’s easy to see why this roof has stood the test of time — its benefits are built right into its shape and history, as noted by the Designing Buildings Wiki.
History and Use of Gambrel Roofs
let’s talk about the history of this type of roof. It’s called a gambrel roof. It has an interesting background. These roofs came to America from England, the Netherlands (Dutch), and France. The one we are using comes from Dutch builders in New York, made around 1740.
These roofs all have two slopes—a steeper slope on top, a flatter one in the middle, and sometimes another steep one at the back. One thing you will see on all of them is a small overhang. That is called a gambrel break or gambrel fascia. It helps keep water from going behind the roof.
This overhang pushes water out, so it doesn’t leak inside. You can also add flashing (a water-proof strip) and even decorate it.
Style and Decoration Ideas
Here’s an old British-style gambrel roof in Virginia, made in the mid-1700s. Same idea: small pitch in the middle, big pitch on the side. They added a flashing piece called a kicker. This helps water drip away from the lower roof.
They also added some crown molding to make it look pretty. It goes all around the edge of the house.
Here’s another old English-style gambrel from the 1700s. Again, you can see the fascia, the kicker, and even a nice decorative trim. They took the same fascia around the dormer window too.
What Are the Benefits of a Gambrel Roof?
Growing up in a North American town filled with barns and older colonial-style homes, I always noticed the unique charm of gambrel roofs. They carry a historical aesthetic that goes back to the 18th century, giving any building a classic and timeless appeal. But beyond the look, there’s real function behind the design. The steep slopes and steep sides help with drainage during rain, which protects the structure from water damage. If damage does occur, it’s important to know how to repair a roof leak to maintain the roof’s integrity. Inside, you get more headroom in the attic, and it often includes dormers and windows that let in natural daylight and increase ventilation. This makes the upper space more usable, whether for storage or living.
From my experience working with roofers, the gambrel roof stands out for its cost-effectiveness. It doesn’t need as many beams or columns, which cuts down on material costs. Plus, it’s easier and quicker to install, which helps reduce overall labor costs. The combination of smart design and practical savings is one reason it’s still used today. Add in the extra space, light, and airflow, and it’s easy to see why this design continues to offer lasting benefits.
Easy Guide to Building a Gambrel Roof
If we see of a gambrel roof. It looks a lot like the one you’re working on. First, you need to find where the beams are. I didn’t see the building drawings, but the beams help set the size of the roof.
When you get the size of the roof with the 7/12 pitch (which means the steeper part), you take away the thickness of the ridge (top beam), then divide it in half. This will tell you how far it is from the beam to the ridge. Now, multiply it by the line length or rafter size. If you’re using a construction calculator, this should be easy. You’ll get a shape like this one.
Cutting Beams and Rafters
The beam can also go higher and be cut at an angle to fit the 7/12 pitch. Then you connect the rafter to its side, just like the ridge here. The place where you put the beam post tells you how far the 24/12 rafter needs to go. Use the formula:
a² + b² = c²
For example: 24² + 12² = square root. That gives you the long side. Divide that by 12, and now you get the rafter length. Use that number to find how long the rafter is—from the outside wall to the inside.
The same thing happens on both sides. It’s a 24/12 pitch. And the same thing happens where the roof meets at an angle (called a valley). It all fits unless you raise the beam. But here, you won’t raise it. You will just cut it at an angle. If you do raise it, cut it so the rafters can still fit nicely. Each rafter then fits into the beam from different sides.
How to Frame Walls and Find Breakpoint
When you build your gable or gambrel walls, lay them flat first. Mark everything on the floor. You might only know the ridge height (how high the roof goes). So you need to find the place where the angles meet. That helps you find the beam locations.
As the person cutting or framing the roof, the main things you need to know are:
– Pitches (7/12, 24/12)
– Runs (how far each part goes)
These runs are from the inside of the ridge to the beam, or from the outside of the building to the post.
How to Find Beams Without Full Info
If you only know the ridge height, you still need to figure out where the beams go. You may need to ask someone. But you can also look at the floor plan. There might be walls underneath that match where the beams should be.
You can look at the room width, subtract it from the full span (building width), and then divide the rest in half. That gives you the beam spot on both sides. Do this on the other side too. If there are matching walls, it helps a lot.
Planning the Roof with Clients
Why This Roof Fits the House
When I first saw this place, I knew a gambrel roof would be perfect. The owners liked the idea too. The front of the house would feel welcoming and lower, while the back would look taller and strong.
Now, we are building that exact roof. You’ll see that in the video. Look close—you’ll notice we added the fascia kicker here. It helps to add trim, like molding around the dormers. Right now, we’re still nailing the wood, but everything is carefully measured to get it just right.
Building the Roof and Getting It Right
How the Roof Was Built Step-by-Step
This is the same gambrel roof we saw earlier. Now let me show you how we made it all fit together. Look at the wall with the three windows and a door. That’s the wall we’re working on.
To make sure all the parts line up, we look from the top down (plan view). We also cut a section view (a slice) of the window. This helps us see all the angles and shapes coming together.
Making Trim and Angles Fit Perfectly
This roof has three slopes:
– A 4 pitch
– A 33 pitch
– A 20 pitch
All of them must fit perfectly. The carpenters need to build the base correctly so that everything else goes smoothly. After that, the trim crew comes in. They add the crown molding, the window trim, and other decorations.
They even add a two-piece crown molding under the edge of the roof. All of this looks great because the rough framing (the basic shape) was done the right way. That’s how everything fits nicely just like we planned.
What is a Gambrel roof design?
A Gambrel roof features two slopes on each side, with the lower slope steeper than the upper.
What is a Mansard roof?
A Mansard roof has four sides with two slopes on each, often used in French architecture.
What is the difference between a Gambrel roof and a Mansard roof?
A Gambrel has slopes on two sides, while a Mansard has slopes on all four.
Where can I find Gambrel roof photos?
Gambrel roof photos can be found online on architecture or home design websites.
What is a Gambrel roof house?
It’s a house with a Gambrel-style roof, often seen in colonial or barn-style homes.
How does a Gambrel roof compare to a Gable roof?
A Gambrel has two slopes per side, while a Gable has one slope per side.

Hello! I’m Abdullah, a passionate professional in the field of construction and roofing. I am the proud owner of SJ Roofing & Venting, a leading construction company based in New York. With years of hands-on experience, I write about various construction methods, techniques, and industry insights to share my knowledge and help others in the field. I’m also the founder and main contributor of this website.